
(How-To) Configure Transport Node Profiles
Transport Node profiles are configured to streamline the process of adding hosts to prepared clusters of NSX-T. A transport node profile contains the configuration details at the cluster level to ensure when a host is added or removed from a transport node cluster it will be automatically configured/unconfigured per the profile options. Transport node profiles ensure a consistent, reliable deployment of transport nodes within your infrastructure. We will walk through the configuration of a transport node profile from start to finish.
1) Login to the NSX-T manager UI.
2) Navigate to System > Fabric > Profiles > Transport Node Profiles > + ADD
3) Under the first tab ‘General’ fill out the desired name of the transport node profile.
Note: Make sure the transport node profile is named to be able to easily identify which clusters should have this profile applied to ease future manageability.
4) Select the ‘Transport Zones’ you want to be used by the clusters for which the profile will be applied.
Note: Transport nodes selected where the N-VDS switches configured with a host membership criteria of “Enhanced Datapath” cannot be applied to KVM transport nodes or ESXi hosts with versions earlier than 6.7.
5) Next, click the N-VDS tab at the top of the page.
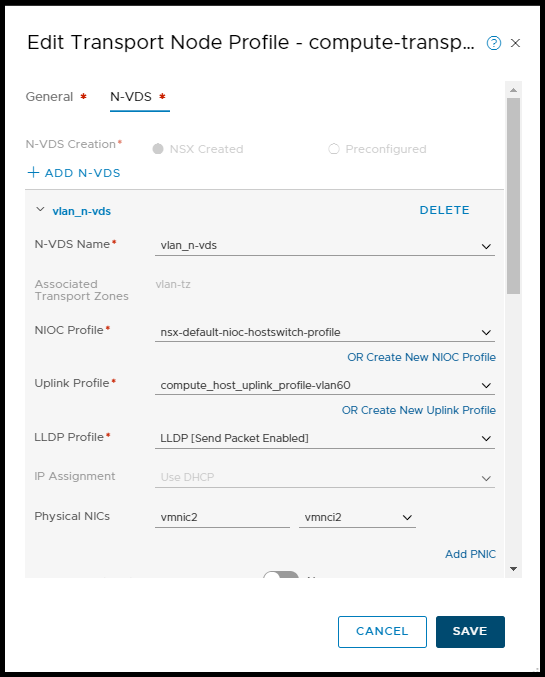
6) On the N-VDS tab, fill in the details:
N-VDS Name: Select an N-VDS you would like to associate with this transport node profile. All transport nodes prepared with this transport node profile will use the N-VDS switches defined here. The N-VDS would have been created earlier.
Associated Transport Zones: This section is grayed out because there is nothing to complete as this section just lists what transport zones are associated with the above N-VDS.
NIOC Profile: Select the default NIOC profile or select one previously created.
Uplink Profile: Select the default uplink profile or select one previously created.
Note: The uplink profile selected here will determine what Physical NICs are available below.
LLDP Profile: Enable or Disable the sending of LLDP advertisements.
The Link Layer Discovery Protocol (LLDP) is used so network devices can advertise their identity, capabilities and neighbors to other network devices. This feature operates similarly to Cisco’s Discovery Protocol (CDP).
IP Assignment: If configuring an overlay N-VDS you can select to use ‘DHCP’, ‘IP Pool’ or a ‘Static IP List’ for IP assignment for the TEPs. If you select to use an ‘IP Pool’ for IP assignment, specify the IP pool to use on the line that appears below.
Physical NICs: Here you can select the available NICs from the uplink profile and provide a name for each. Select the first NIC and provide a name. To add additional NICs select Add PNIC and select from the list of remaining physical NICs associated with the uplink profile selected above.
Note: Naming the physical NICs meaningfully will help ease manageability and troubleshooting issues down the road. Try to avoid generic names such as “Uplink 1”. For example, using vmnic1 for an ESXi hosts vmnic1 will provide easy mapping between vCenter and NSX UI’s.
Network Mappings
At the bottom of the N-VDS configuration you can map VMkernel adapters and physical interfaces defined above for install and if necessary in the future, uninstall. This feature allows you to migrate various VMkernel adapters such as vMotion among others to be attached to a segment on an N-VDS instead of managing these interfaces from vCenter or ESXi via a standard or distributed switch.
PNIC only Migration: Enable this option if all the above vmnic’s configured are not being used for VMkernel network traffic. If any of the above vmnic’s defined above are used to pass VMkernel traffic, do not enable this option and either change the VMkernel’s dependency to the above vmnic’s or ensure you migrate the affected VMkernel adapter to segments below under the ‘Network Mappings for Install’ link.
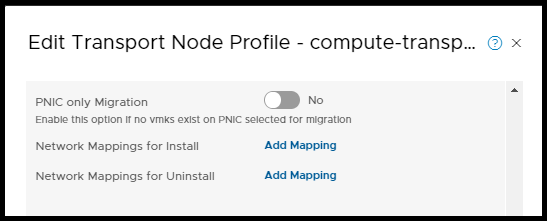
Network Mappings for Install: This feature is available to allow migrating VMkernel adapters to an N-VDS switch during installation to map to an existing VLAN segment or logical switch on an N-VDS.
1) Click Add Mapping (Next to Network Mappings for Install)
2) Click + ADD
3) Then click the pencil edit icon that appears at the bottom right corner of the cell in each column.
Here you can add the VMkernel adapters you want to migrate and select which VLAN segment or Logical Switch you want to attach the VMkernel adapter.
4) When done, click ADD

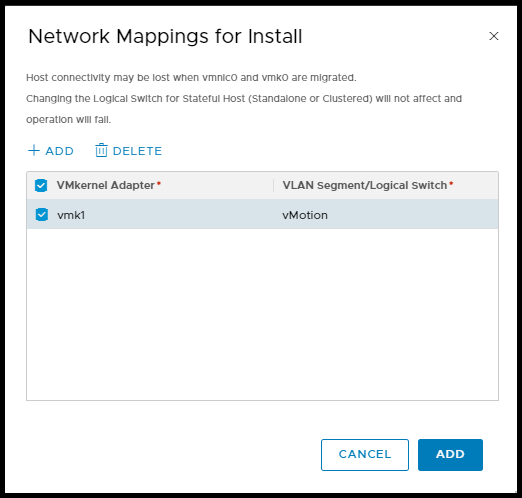
Note: If you choose to map vmkernel adapters to a segment on an N-VDS make sure you configure the uninstallation mapping in case you need to remove a host from being a transport node in the future. This will prevent isolation.
DO NOT DELETE THE ORIGINAL STANDARD OR DISTRIBUTED SWITCH FOR WHICH THE VMKERNEL ADAPTERS ARE ATTACHED. THESE OBJECTS MUST EXIST FOR PROPER UNINSTALLATION TO PREVENT POTENTIAL ISOLATION OF A HOST.
Network Mappings for Uninstall: Pre-configuring a network mapping for uninstall will allow the NSX-T manager to revert the migration of VMkernel adapter to port groups on a standard switch or a distributed switch to ensure communication is maintained and host isolation does not occur.
1) Click Add Mapping (Next to Network Mappings for Uninstall)
2) Under the ‘VMKNic Mappings’ tab click, + ADD
Here you can specify which VMkernel Adapter you want to migrate and specify which PortGroup you want to move the VMkernel interface.
3) After clicking + ADD, you can specify the VMkernel adapter by clicking on the small pencil icon at the bottom right corner of the cell in the first column.
4) Next, you can specify the port group to migrate the VMkernel adapter to by clicking the small pencil icon at the bottom right corner of the cell in the second column.

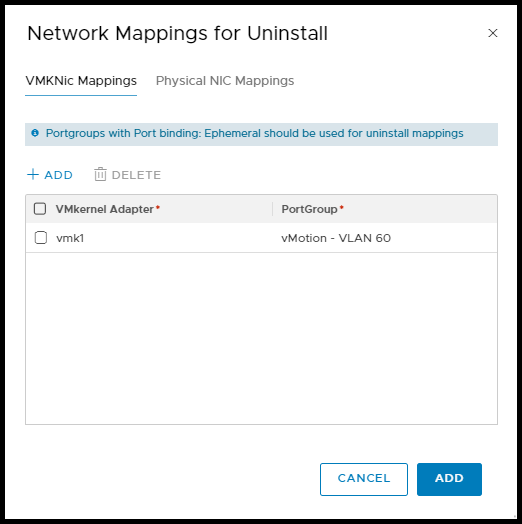
5) When you are done defining the VMkernel adapter to port group mappings select the Physical NIC Mappings tab at the top of the page.
6) Click + ADD
7) click on the pencil icon at the bottom right corner of the cell in the body below and type in the name of the vmnic’s you want to migrate off NSX-T when uninstalling a host.
8) When done adding in the vmnic’s click, ADD


Once you have completed filling out the details for your first N-VDS, click + ADD N-VDS at the top and select the next N-VDS from the drop down you want to configure.
When done configuring the transport node profile, click FINISH.
