
(How-To) Prepare Host Transport Nodes (ESXi)
We are going to walk through the preparation of our ESXi hosts to become Transport Nodes. Once complete, we will be able to start applying NSX-T features and policies to your data center deployment.
This process is very straight forward with just a couple of clicks. However, there are some prerequisites that you need to have completed prior to preparing hosts as transport nodes.
Prerequisites:
- Create the transport zones you wish your transport nodes to participate. (How-To) Create NSX-T Transport Zones.
- Pre-configure uplink profiles for the transport zones you wish to apply to your transport nodes (hosts). (How-To) Configure NSX-T Uplink Profiles.
- (optional) Register your NSX-T manager with a compute manager (vCenter). (How-To) Register a Compute Manager with NSX-T.
There are a couple of ways to prepare our ESXi hosts to become transport nodes within our NSX-T infrastructure. The first way we are going to walk through is by configuring the transport nodes at the cluster level and applying a ‘Transport Node Profile’. If you have not already configured a transport node profile, you can walk through this how-to and come back. (How-To) Configure NSX-T Transport Node Profiles.
1) Login to the NSX-T manager UI.
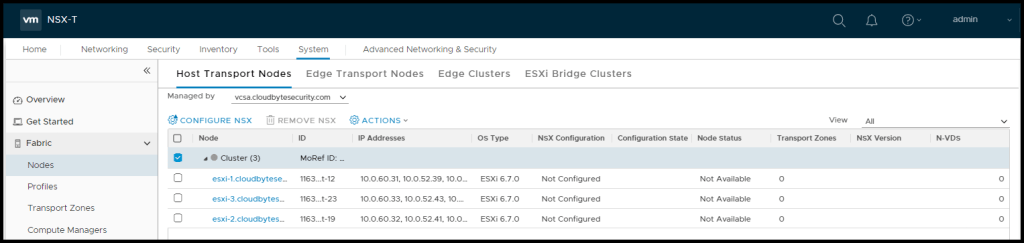
2) Navigate to System > Fabric > Nodes > Host Transport Nodes
3) Click on the ‘Managed by‘ drop down just below the top menu and select the compute manager with the hosts you want to configure as transport nodes.

After selecting the desired compute manager in the drop down, your ESXi hosts will appear. If they are in a cluster, that logical grouping will be represented here as well.
Prepare Entire Cluster
1) Next, select the ESXi hosts you want to prepare for NSX-T as transport nodes. To prepare an entire cluster, select the cluster level object as shown in the above screenshot and NSX-T will prepare all the hosts currently residing in that cluster.
2) Select the check box next to the cluster and click ‘CONFIGURE NSX‘.
3) Next, we will select the transport node profile we wish to apply to the hosts in the cluster. Once complete, click SAVE.
After clicking SAVE, we will see the profile get applied to all the hosts in the cluster. Once the loading bar page closes, we will see the hosts in the cluster will all show ‘NSX Install In Progress‘.
Note: If you don’t see the install taking place, simply refresh the UI by scrolling to the bottom of the page and clicking the grey REFRESH button in the footer of the page and you should now see the hosts getting prepared.
Prepare Individual ESXi Hosts
To prepare an individual ESXi host to become a transport node the steps for preparing a cluster are largely the same as above.
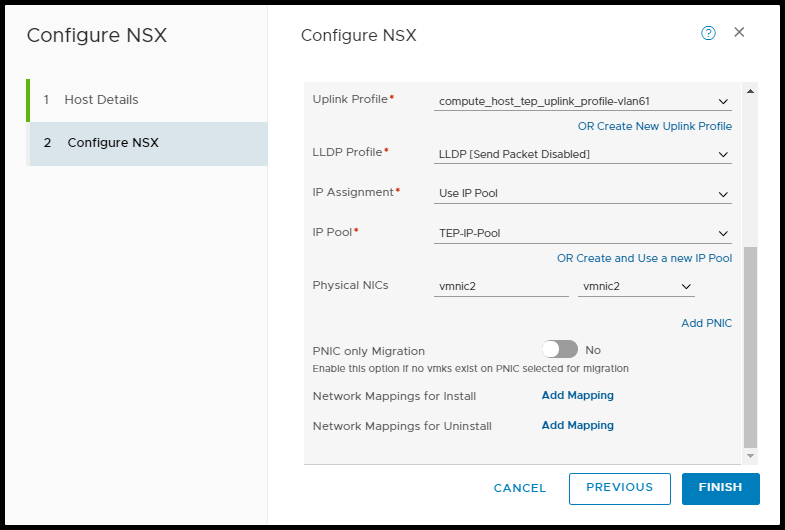
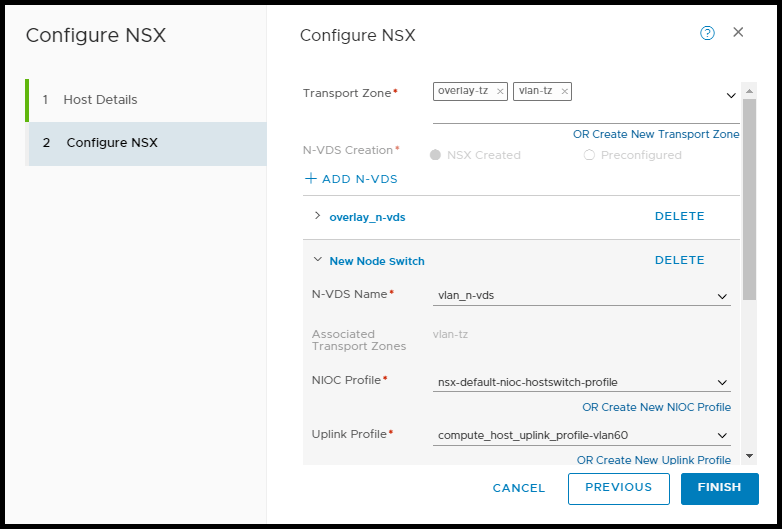
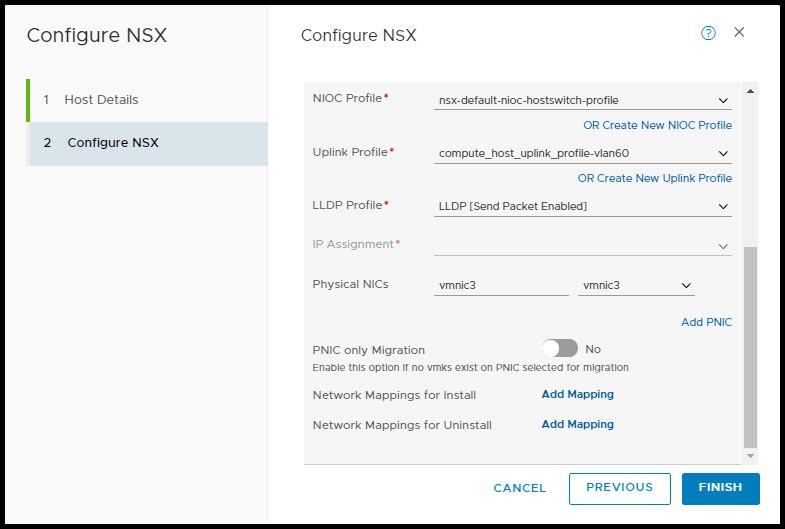
1) Instead of selecting the cluster level object, select the individual ESXi host you want to configure as a transport node. Then, click ‘CONFIGURE NSX‘.

2) Next, a pop-out window will appear to begin configuring the relevant transport node options for the ESXi host. When done, click FINISH.
Note: For details on the various configuration options for an individual ESXi host, please review the (How-To) Configure NSX-T Transport Node Profiles article for details.


While the install is taking place, if you navigate to your vCenter server Recent Tasks pane you will see the ESXi hosts being prepared.

Post Host Preparation Install Checks
After the hosts have been successfully prepared, we can login to an ESXi hosts CLI to see the changes that were made.
We start by confirming the VIBs have been successfully installed. By running the following command:
esxcli software vib list |grep -e nsx -e vsipnsx-adf 2.4.2.0.0-6.7.14269678 VMware VMwareCertified 2019-10-18
nsx-aggservice 2.4.2.0.0-6.7.14269653 VMware VMwareCertified 2019-10-18
nsx-cli-libs 2.4.2.0.0-6.7.14269579 VMware VMwareCertified 2019-10-18
nsx-common-libs 2.4.2.0.0-6.7.14269579 VMware VMwareCertified 2019-10-18
nsx-context-mux 2.4.2.0.0esx67-14269709 VMware VMwareCertified 2019-10-18
nsx-esx-datapath 2.4.2.0.0-6.7.14269571 VMware VMwareCertified 2019-10-18
nsx-exporter 2.4.2.0.0-6.7.14269653 VMware VMwareCertified 2019-10-18
nsx-host 2.4.2.0.0-6.7.14269548 VMware VMwareCertified 2019-10-18
nsx-metrics-libs 2.4.2.0.0-6.7.14269579 VMware VMwareCertified 2019-10-18
nsx-mpa 2.4.2.0.0-6.7.14269653 VMware VMwareCertified 2019-10-18
nsx-nestdb-libs 2.4.2.0.0-6.7.14269579 VMware VMwareCertified 2019-10-18
nsx-nestdb 2.4.2.0.0-6.7.14269662 VMware VMwareCertified 2019-10-18
nsx-netcpa 2.4.2.0.0-6.7.14269635 VMware VMwareCertified 2019-10-18
nsx-opsagent 2.4.2.0.0-6.7.14269653 VMware VMwareCertified 2019-10-18
nsx-platform-client 2.4.2.0.0-6.7.14269653 VMware VMwareCertified 2019-10-18
nsx-profiling-libs 2.4.2.0.0-6.7.14269579 VMware VMwareCertified 2019-10-18
nsx-proxy 2.4.2.0.0-6.7.14269676 VMware VMwareCertified 2019-10-18
nsx-python-gevent 1.1.0-9273114 VMware VMwareCertified 2019-10-18
nsx-python-greenlet 0.4.9-9272996 VMware VMwareCertified 2019-10-18
nsx-python-logging 2.4.2.0.0-6.7.14269678 VMware VMwareCertified 2019-10-18
nsx-python-protobuf 2.6.1-10416526 VMware VMwareCertified 2019-10-18
nsx-rpc-libs 2.4.2.0.0-6.7.14269579 VMware VMwareCertified 2019-10-18
nsx-sfhc 2.4.2.0.0-6.7.14269653 VMware VMwareCertified 2019-10-18
nsx-shared-libs 2.4.2.0.0-6.7.14173130 VMware VMwareCertified 2019-10-18
nsx-upm-libs 2.4.2.0.0-6.7.14269579 VMware VMwareCertified 2019-10-18
nsx-vdpi 2.4.2.0.0-6.7.14269694 VMware VMwareCertified 2019-10-18
nsxcli 2.4.2.0.0-6.7.14269559 VMware VMwareCertified 2019-10-18
vsipfwlib 2.4.2.0.0-6.7.14269595 VMware VMwareCertified 2019-10-18If you don’t want to read each line and match them all up you can simply have Linux count the number of VIBs added by running the following command:
esxcli software vib list |grep -e nsx -e vsip |wc -l
28
Note: NSX-T 2.4.x VIB count should be 28
Next, we can also confirm the services that have been installed on the ESXi host by running the following command.
ls -lath /etc/init.d/ |grep -e nsx -e netcpadlrwxrwxrwx 1 root root 24 Oct 18 14:35 nsxa -> /etc/init.d/nsx-opsagent
-r-xr-xr-x 1 root root 5.4K Jul 29 20:14 nsx-exporter
-r-xr-xr-x 1 root root 4.0K Jul 29 20:06 nsx-sfhc
-r-x------ 1 root root 3.5K Jul 29 20:05 nsx-platform-client
-r-x------ 1 root root 6.8K Jul 29 20:04 nsx-opsagent
-r-xr-xr-x 1 root root 6.9K Jul 29 19:57 nsx-mpa
-r-xr-xr-x 1 root root 9.3K Jul 29 19:39 netcpad
-r-xr-xr-x 1 root root 4.4K Jul 29 19:39 nsx-pre-netcpa
-r-xr-xr-x 1 root root 3.4K Jul 29 19:37 nsx-nestdb
-r-xr-xr-x 1 root root 4.5K Jul 29 19:37 nsx-pre-nestdb
-r-xr-xr-x 1 root root 5.8K Jul 29 19:35 nsx-vdpi
-r-xr-xr-x 1 root root 6.0K Jul 29 19:33 nsx-proxy
-r-xr-xr-x 1 root root 53.0K Jul 29 19:13 nsx-datapath
-r-xr-xr-x 1 root root 3.7K Jul 29 19:05 nsx-context-mux
-r-xr-xr-x 1 root root 676 Jul 29 19:00 nsxcliIf you don’t want to read each line and match them all up you can simply have Linux count the number of services added by running the following command:
ls -lath /etc/init.d/ |grep -e nsx -e netcpad |wc -l
15
Note: NSX-T 2.4.x services count should be 15
Next, we can see the connections to the NSX-T manager management plane and the control plane.
The service on the ESXi host responsible for communication with the NSX-T managers management plane is the nsx-mpa. We can confirm the service is running by running the following command.
/etc/init.d/nsx-mpa status
NSX-Management-Plane-Agent is running
We can then confirm the ESXi host is communicating with the NSX-T manager via the nsx-mpa (mpa) service by running the following command:
esxcli network ip connection list |grep 5671
tcp         0       0  10.0.60.32:54770  10.0.60.45:5671   ESTABLISHED   2244518  newreno  mpa
tcp         0       0  10.0.60.32:54769  10.0.60.45:5671   ESTABLISHED   2244518  newreno  mpa
The nsx-mpa service communicates with the NSX-T management plane via TCP port 5671. With the above output, we can see the connection is ESTABLISHED with a TCP connection. Also, at the end of each line we can see which service on the ESXi host responsible is for this connection. In this output we can see its the mpa service otherwise known as the nsx-mpa. Finally, from this output we can see we which NSX-T manager we are communicating. In this output we can see the NSX-T manager responsible for this ESXi host has an IP address of 10.0.60.45.
Note: Transport nodes will not communicate with all the NSX-T managers and will never connect to the VIP IP. The NSX-T managers decide which transport nodes each NSX-T manager is responsible for via a process called sharding.
The service on the ESXi host responsible for communication with the NSX-T managers control plane is the nsx-proxy. We can confirm the service is running by running the following command.
/etc/init.d/nsx-proxy status
nsx-proxy agent service is running
We can then confirm the ESXi host is communicating with the NSX-T manager via the nsx-proxy service by running the following command:
esxcli network ip connection list |grep 1235
tcp         0       0  10.0.60.32:22812  10.0.60.45:1235   ESTABLISHED   2244380  newreno  nsx-proxy
The nsx-proxy service communicates with the NSX-T control plane via TCP port 1235. With the above output, we can see the connection is ESTABLISHED with a TCP connection. Also, at the end of each line we can see which service on the ESXi host responsible is for this connection. In this output we can see its the nsx-proxy service. Finally, from this output we can see we which NSX-T manager we are communicating. In this output we can see it is the same NSX-T manager for which the ESXi host is communicating via TCP port 5671.
Now we can confirm the TEP(s) have been created and necessary vmkernel interfaces.
When an ESXi host becomes a transport node, a number of vmkernel (vmk#) interfaces get created. One or more interfaces get created to encapsulate overlay traffic for communication between transport nodes. These vmkernel interface(s) is where GENEVE traffic is sent. The TEP interfaces created begin with vmk10 and increment up from there depending on the number of TEPs selected when preparing the transport node or what configuration has been selected and applied via a transport node profile.
A second interface is created, vmk50. This vmkernel interface is the hyperbus interface. This interface is an internal loopback interface used to establish communication with host containerized workloads. Because this internal interface does not send traffic outside of the ESXi host, the network automatically configured has an APIPA IP assigned from the range, 169.254.0.0/24 subnet.
We can see these interfaces via the ESXi CLI by running the following command:
esxcli network ip interface ipv4 address list
Name   IPv4 Address  IPv4 Netmask     IPv4 Broadcast   Address Type  Gateway    DHCP DNS
-----  ------------  ---------------  ---------------  ------------  ---------  --------
vmk0   10.0.60.32    255.255.255.0    10.0.60.255      STATIC        10.0.60.1     false
vmk1   10.0.52.41    255.255.255.224  10.0.52.63       STATIC        0.0.0.0       false
vmk2   10.0.52.42    255.255.255.224  10.0.52.63       STATIC        0.0.0.0       false
vmk3   10.0.60.35    255.255.255.0    10.0.60.255      STATIC        0.0.0.0       false
vmk10  10.0.61.36    255.255.255.224  10.0.61.63       STATIC        0.0.0.0       false
vmk50  169.254.1.1   255.255.0.0      169.254.255.255  STATIC        0.0.0.0       false
Note: If the hyperbus interface (vmk50) is not present, the hypervisor host preparation for NSX-T is not complete.
Finally, we will go back to the NSX-T UI and verify the transport node configuration was a success.
Navigate to System > Fabric > Nodes > Host Transport Nodes
Click on the ‘Managed by‘ drop down just below the top menu and select the compute manager with the hosts you configured NSX-T.
From here we should see the ‘Configuration State‘ and the ‘Node Status‘ as ‘Success’ and ‘Up’, respectively.

Note: If you see ‘Degraded’ or ‘Down’ under the ‘Node Status’ column simply click the small circled i and a pop-out menu will appear listing all the underlying connections and their status’. This will help narrow down where to begin looking to resolve the transport node preparation issue.
