
(How-To) Replace NSX-T Self-Signed Certificates
Troubleshooting: certificate does not verify with supplied key
Troubleshooting: Certificate chain validation failed
Troubleshooting: No CDP specified in the certificate
Troubleshooting: Basic constraints Extension is not present in the certificate
Troubleshooting: Certificate-Expired
Once you have completed the install of your three NSX-T manager nodes it is a good idea to replace the certificates with certificate authority (CA) signed certificates with your domain. This will provide better security knowing the web page you are connecting to is trusted. Also, you can avoid that annoying “Your connection is not private” page. We will walk through how to replace all the system generated certificates used with the NSX-T manager platform. This includes all three NSX-T manager HTTPS certificates as well as the cluster/VIP certificate.
To begin you will need to get a certificate signed by your CA. Here are the required/suggested parameters you will need to include in your certificate.
- X.509 Format
- RSA2048 – RSA4096
- SHA256 – SHA512
- Full chain of trust certificates from the server certificate down to the root certificate (leaf – intermediate – root)
Note: basicConstraints=CA:FALSE (Required for the server certificate (leaf) on NSX-T versions prior to 3.0.2) This goes against PKIX guidelines but some CAs do it and some software requires this to avoid interpreting an end server certificate (leaf) as a CA.
It is also recommended to use a common CA signed certificate for all three NSX-T manager nodes as well as the VIP. This can be achieved by adding each node and VIP’s FQDN to the subject alternative name (SAN).

Once you have the signed certificate we can now begin to add, validate and replace the certificates.
1) Login to your NSX-T manager web UI
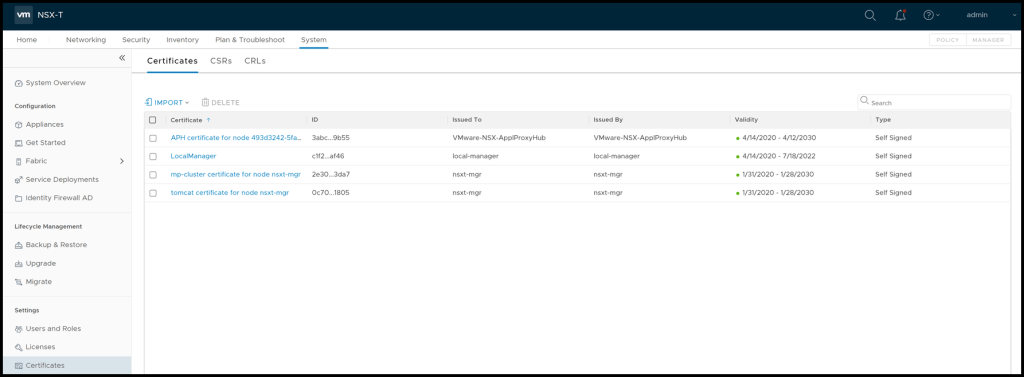
2) Navigate to System > Certificates > Certificates
Here is where all the NSX-T platform and service certificates are located within the GUI.
Note: Platform and NSX Service certificates are stored separately within the system and certificates imported as an NSX Service certificate cannot be used for platform or the reverse.
| Naming Convention in NSX Manager | Purpose | Replaceable | Default Validity |
|---|---|---|---|
| tomcat | This is an API certificate used for external communication with individual NSX Manager nodes through UI/API. | Yes | 825 days |
| mp-cluster | This is an API certificate used for external communication with the NSX Manager cluster using the cluster VIP, through UI/API. | Yes | |
| LocalManager | This is a platform Principal Identity certificate specifically for Federation. If you are not using Federation, this certificate is not used. | Yes | |
| Not visible in the UI | Certificates used for internal communication between different system components. | No | 10 years |
For the purposes of this article we will be replacing the default ‘tomcat‘ and default ‘mp-cluster‘ certificates. You can use the NSX-T default certificate naming convention table above to reference which certificates listed within your deployment are going to be replaced.
3) Next, click the drop down menu IMPORT > Import Certificate

4) Here you will add all the details of your certificate to add it to the NSX-T manager for use by either a service or platform
Name: Enter a descriptive name of the certificate as well as where it will be used. i.e. nsxt-mgr http certificate
Certificate Contents: Here you will either paste the certificate(s) contents or if you have a properly formatted txt/cert file you can select ‘BROWSE…‘ and select the file
Note: All certificates within the chain of trust must be included within the ‘Certificate Contents‘ section in the following order (leaf – intermediary – root)
-----BEGIN CERTIFICATE----- MIIGajCCBVKgAwIBAgISBHeBbGZO69MqVtmiu2dRQH14MA0GCSqGSIb3DQEBCwUA<snipped> ***SERVER CERTIFICATE (LEAF)*** <snipped>VPIzKUMZVFmlqePwHvMxmTewKBPiIMyXAGnMESe/5TlBDLxQXvssPgu0MOZ0KlyM -----END CERTIFICATE----------BEGIN CERTIFICATE----- MIIEkjCCA3qgAwIBAgIQCgFBQgAAAVOFc2oLheynCDANBgkqhkiG9w0BAQsFADA/<snipped> ***INTERMEDIARY CERTIFICATE (INTERMEDIARY)*** <snipped>PfZ+G6Z6h7mjem0Y+iWlkYcV4PIWL1iwBi8saCbGS5jN2p8M+X+Q7UNKEkROb3N6 -----END CERTIFICATE----------BEGIN CERTIFICATE----- MIIDSjCCAjKgAwIBAgIQRK+wgNajJ7qJMDmGLvhAazANBgkqhkiG9w0BAQUFADA/<snipped> **ROOT CERTIFICATE (ROOT)** <snipped>JDGFoqgCWjBH4d1QB7wCCZAA62RjYJsWvIjJEubSfZGL+T0yjWW06XyxV3bqxbYo -----END CERTIFICATE-----
Private Key: Here you will either paste the server certificates private key contents or if you have a properly formatted txt/cert file you can select ‘BROWSE…‘ and select the file
Passphrase: If the certificate is encrypted, input the passphrase here to decrypt the certificate
Description: Enter a description of the certificate
Service Certificate (toggle):
Yes – If you are planning on using this certificate for an NSX-T service such as a load balancer or VPN
No – If you are planning on using this certificate for the NSX-T platform itself
5) When done, click IMPORT

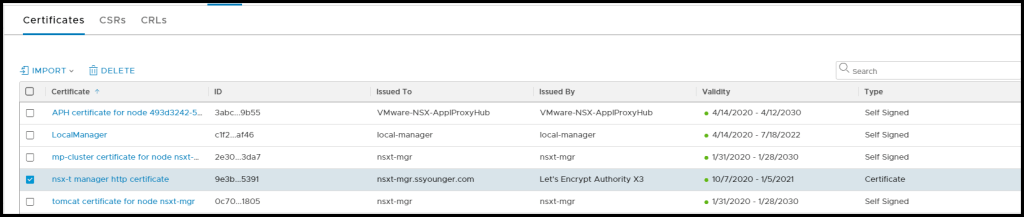
We can now see the certificate we just added on the Certificates page. Under the ‘Issued By‘ column in the middle, we can see which certificate authority (CA) issued this certificate. Under the ‘Type‘ column at the end we can see it is a CA signed certificate instead of Self Signed.
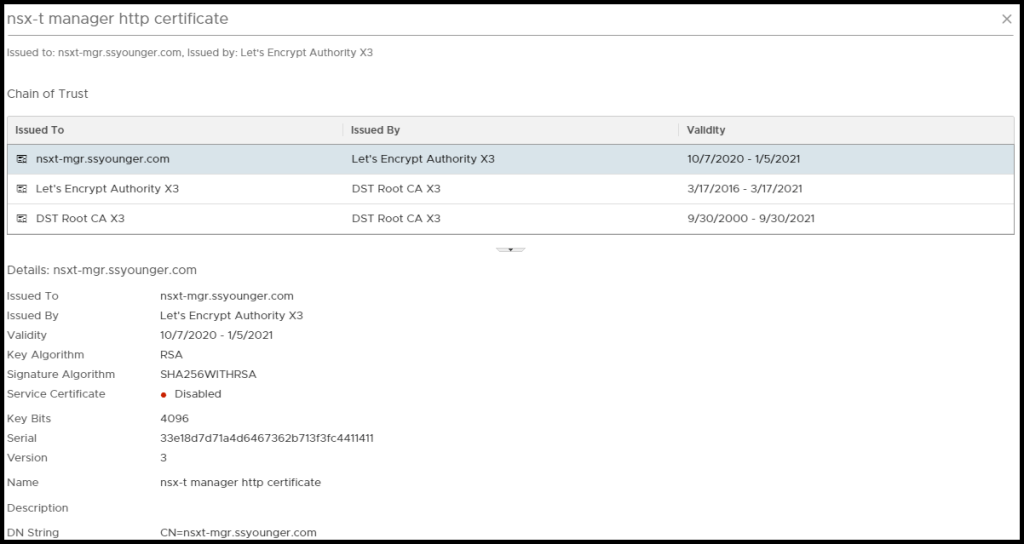
When we click on the newly added certificates hyperlink we can get more detail and view the chain of trust as it was imported in the previous step.
Next, we need to validate we imported the certificate correctly before applying to our NSX-T manager appliances and VIP
6) We will need to copy the certificate ID out from the ‘ID‘ column on the Certificates page as this ID will be used for the subsequent API calls to both validate the certificate and apply it to the NSX-T platform

7) To validate the certificate, we need to run the following API call:
REQUEST:
GET https://<nsx-mgr>/api/v1/trust-management/certificates/<certificate-id>?action=validateRESPONSE:
{
    "status": "OK"
}
Alternatively, you can run the same API call via CURL with the following command:
curl -k -u admin https://<nsx-mgr>/api/v1/trust-management/certificates/<certificate-id>?action=validate{
"status" : "OK"
}| -k | Insecure – Do not check the certificate being presented by the server |
| -u | User – Define the user. You can add a colon ‘:’ and the password in clear text if you wish |
Now that we have successfully validated our certificate we can now apply the certificate so the NSX manager(s) platform uses it instead of the default self signed certificate which was auto generated when the appliance was deployed
Note: This API call needs to be run against each NSX-T manager node to replace each of their certificates
8) To apply the validated certificate we will run the following API call:
REQUEST:
POST https://<nsx-mgr>/api/v1/node/services/http?action=apply_certificate&certificate_id=<certificate-id>RESPONSE:
{
    "certificate_id": "9e3b04c0-0f6f-413b-839a-87ff09835391"
}
Alternatively, you can run the same API call via CURL with the following command:
curl -k -u admin -X POST https://<nsx-mgr>/api/v1/node/services/http?action=apply_certificate&certificate_id=<certificate-id>Command Flags:
| -k | Insecure – Do not check the certificate being presented by the server |
| -u | User – Define the user. You can add a colon ‘:’ and the password in clear text if you wish |
| -X | Request – Specified the request type to be used. i.e. GET (default), PUT, POST, etc… |
Repeat this API call by changing the NSX-T manager IP/FQDN within the POST header to the remaining NSX-T managers.
Now that you have successfully replaced the default self-signed certificates for the NSX-T manager platform you can close your browser or tab and re-open to navigate to each of the NSX-T manager appliance UI’s and see the connection is trusted and secure.
9) Now that we have successfully changed the NSX-T manager node certificates, we need to change the cluster certificate so the VIP has a signed certificate as well. To do that we need to run the following API call.
Note: This API call can be sent to any one of the NSX-T manager appliances in the cluster
REQUEST:
POST https://<nsx-mgr>/api/v1/cluster/api-certificate?action=set_cluster_certificate&certificate_id= <certificate-id>RESPONSE:
200 OK - No body in the responseAlternatively, you can run the same API call via CURL with the following command:
curl -k -u admin -X POST https://<nsx-mgr>/api/v1/cluster/api-certificate?action=set_cluster_certificate&certificate_id= <certificate-id>| -k | Insecure – Do not check the certificate being presented by the server |
| -u | User – Define the user. You can add a colon ‘:’ and the password in clear text if you wish |
| -X | Request – Specified the request type to be used. i.e. GET (default), PUT, POST, etc… |
We have now successfully replaced all three NSX-T manager node certificates as well as the VIP.
By default, NSX-T will alert you when the certificates are about to expire so you can replace them.
TROUBLESHOOTING
Error Message:
“certificate does not verify with supplied key”
Reason:
The certificate was imported without the complete chain of trust. i.e. (leaf – intermediate – root) certificates.
Resolution:
Delete the certificate you just added as editing is not possible and then import again. The change needs to occur in the ‘Certificate Contents‘ field. Here you need to add all of the certificates in the proper order.
-----BEGIN CERTIFICATE----- MIIGajCCBVKgAwIBAgISBHeBbGZO69MqVtmiu2dRQH14MA0GCSqGSIb3DQEBCwUA<snipped> ***SERVER CERTIFICATE (LEAF)*** <snipped>VPIzKUMZVFmlqePwHvMxmTewKBPiIMyXAGnMESe/5TlBDLxQXvssPgu0MOZ0KlyM -----END CERTIFICATE----------BEGIN CERTIFICATE----- MIIEkjCCA3qgAwIBAgIQCgFBQgAAAVOFc2oLheynCDANBgkqhkiG9w0BAQsFADA/<snipped> ***INTERMEDIARY CERTIFICATE (INTERMEDIARY)*** <snipped>PfZ+G6Z6h7mjem0Y+iWlkYcV4PIWL1iwBi8saCbGS5jN2p8M+X+Q7UNKEkROb3N6 -----END CERTIFICATE----------BEGIN CERTIFICATE----- MIIDSjCCAjKgAwIBAgIQRK+wgNajJ7qJMDmGLvhAazANBgkqhkiG9w0BAQUFADA/<snipped> **ROOT CERTIFICATE (ROOT)** <snipped>JDGFoqgCWjBH4d1QB7wCCZAA62RjYJsWvIjJEubSfZGL+T0yjWW06XyxV3bqxbYo -----END CERTIFICATE-----
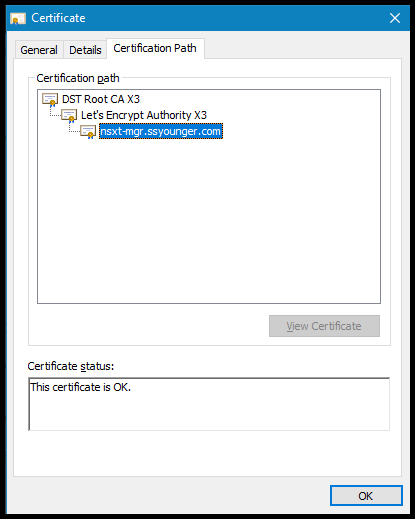
To determine how many certificates you should have in your chain of trust, simply open the certificate and click on the Certification Path tab. Here you will see a chain of certificates . From the below example there are three certificates within the chain of trust.
Once you have successfully imported your certificate again you will need to run through the validation API call again but make sure you take note of the new certificate ID generated on the Certificates tab.
Error Message:
“Certificate chain validation failed. Make sure a valid chain is provided in order leaf,intermediate,root certificate. (Error code: 2076)”
Reason:
The certificate chain of trust was not imported in the correct order. The correct order is (top to bottom):
- Server (leaf)
- Intermediary (intermediate)
- Root (root)
Resolution:
Delete the certificate you just added as editing is not possible and then import again. The change needs to occur in the ‘Certificate Contents‘ field. Here you need to add all of the certificates in the proper order.
-----BEGIN CERTIFICATE----- MIIGajCCBVKgAwIBAgISBHeBbGZO69MqVtmiu2dRQH14MA0GCSqGSIb3DQEBCwUA<snipped> ***SERVER CERTIFICATE (LEAF)*** <snipped>VPIzKUMZVFmlqePwHvMxmTewKBPiIMyXAGnMESe/5TlBDLxQXvssPgu0MOZ0KlyM -----END CERTIFICATE----------BEGIN CERTIFICATE----- MIIEkjCCA3qgAwIBAgIQCgFBQgAAAVOFc2oLheynCDANBgkqhkiG9w0BAQsFADA/<snipped> ***INTERMEDIARY CERTIFICATE (INTERMEDIARY)*** <snipped>PfZ+G6Z6h7mjem0Y+iWlkYcV4PIWL1iwBi8saCbGS5jN2p8M+X+Q7UNKEkROb3N6 -----END CERTIFICATE----------BEGIN CERTIFICATE----- MIIDSjCCAjKgAwIBAgIQRK+wgNajJ7qJMDmGLvhAazANBgkqhkiG9w0BAQUFADA/<snipped> **ROOT CERTIFICATE (ROOT)** <snipped>JDGFoqgCWjBH4d1QB7wCCZAA62RjYJsWvIjJEubSfZGL+T0yjWW06XyxV3bqxbYo -----END CERTIFICATE-----
Error Message:
“Certificate was rejected: CRL check failed: No CDP specified in the certificate”
Reason:
The imported root or intermediate certificates don’t have CRL-DP specified
CRL-DP: Certificate Revocation List – Distribution Points Extension
The CRL distribution points is an X.509 v3 certificate extension which identifies the location of the CRL from which the revocation of this certificate can be checked.
Resolution:
Option 1 – You can delete the rejected certificate you just imported and then add the CRL-DP extension and relevant information and then import the certificate again and run the validation check again.
Option 2 – You can disable the CRL check by running the following API call.
REQUEST:
GET https://<nsx-t manager>/api/v1/global-configs/SecurityGlobalConfigRESPONSE:
{
    "crl_checking_enabled": true,
    "ca_signed_only": false,
    "resource_type": "SecurityGlobalConfig",
    "id": "cf4ecf22-41dc-40aa-9159-6961d6fd0d17",
    "display_name": "cf4ecf22-41dc-40aa-9159-6961d6fd0d17",
    "_create_user": "system",
    "_create_time": 1580500331714,
    "_last_modified_user": "system",
    "_last_modified_time": 1602174051713,
    "_system_owned": false,
    "_protection": "NOT_PROTECTED",
    "_revision": 66
}
You will need to take the highlighted lines from the API call output body and paste them into the body of your next API PUT call. We will need to change the “crl_checking_enabled” value to false.
Here is what the API call should look like.
REQUEST:
PUT https://<nsx-t manager>/api/v1/global-configs/SecurityGlobalConfigBODY:
{
    "crl_checking_enabled": false,
    "resource_type": "SecurityGlobalConfig",
    "_revision": 66
}
Once you have successfully run the above API call to disable CRL checking you can run the validation API call again to confirm success.
Error Message:
“Certificate validation failed. Reason : Certificate is not compliant as certificate of type SERVER: Basic constraints Extension is not present in the certificate”
Reason:
The basicConstraints=CA:FALSE extension is not present on the leaf certificate.
Note: This check is removed in NSX-T version 3.0.2
Resolution:
Option 1 – You can upgrade your NSX-T deployment to 3.0.2 or above to avoid avoid this check.
Option 2 – You can delete the imported certificate and modify the certificate you want to import to include the basicConstraint required to satisfy the check done on during validation.
Error Message:
“Certificate validation failed. Reason : Certificate was rejected: Certificate expired”
Reason:
The certificate you are trying to validate is expired. Expired certificates cannot be imported into NSX.
Resolution:
Delete the expired certificate and import another certificate that is not expired.
