
(How-To) Setup Automatic Backups For NSX-T
Configuring automatic backups on a critical server is so important it is difficult to overstate. After a successful deployment of NSX-T in your environment automatic backups should be configured immediately following that initial install.
We are going to walk through how to successfully configure automatic SFTP backups of our NSX-T manager as well as walk through the folder structure created during each backup and what log messages are generated so you can spot key phases of the backup being passed so you can narrow your troubleshooting if a backup failure occurs. Finally, we will walk through how to automate the cleanup of old backup files.
1) Login to your NSX-T manager web UI
2) Navigate to System > Backup & Restore > EDIT (top right corner)
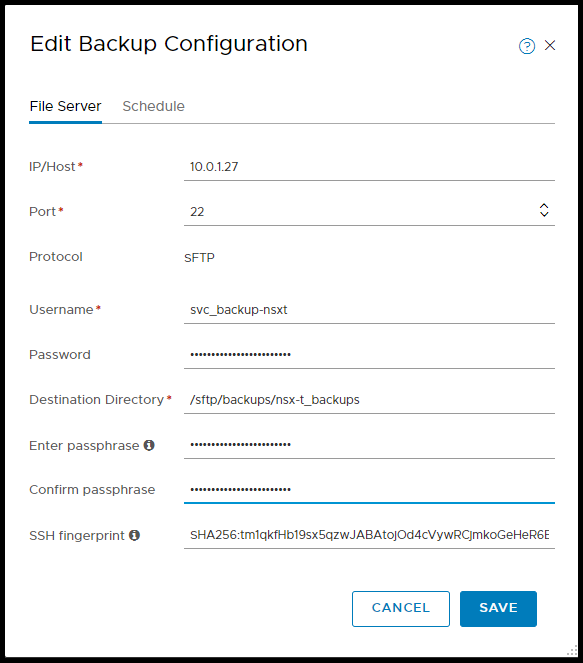
3) Fill in the following information in the pop up window
IP/Host: IP address or FQDN of the SFTP backup server
Note: I would recommend not using the FQDN but rather use the IP address of the SFTP server. This way if there is a DNS issue, backups can still be taken successfully.
Port: You can leave the default SFTP port (22) or change it if you changed this value in the sshd_config file on the SFTP server
sshd_config (excerpt):
#       $OpenBSD: sshd_config,v 1.101 2017/03/14 07:19:07 djm Exp $

# This is the sshd server system-wide configuration file.  See
# sshd_config(5) for more information.

# This sshd was compiled with PATH=/usr/bin:/bin:/usr/sbin:/sbin

# The strategy used for options in the default sshd_config shipped with
# OpenSSH is to specify options with their default value where
# possible, but leave them commented.  Uncommented options override the
# default value.

#Port 22
#AddressFamily any
#ListenAddress 0.0.0.0
Protocol: SFTP is the only supported protocol NSX-T supports
Note: Try not to confuse FTPS with SFTP. These are two completely different protocols and FTPS will not work
Username: Input the service account created earlier on the SFTP server that is responsible for backups
Password: Input the service account password created earlier on the SFTP server.
“The first time you configure a file server, you must provide a password. Subsequently, if you reconfigure the file server, and the server IP or hostname), port, and user name are the same, you do not need to enter the password again.”
NSX-T DATA CENTER INSTALLATION GUIDE (pg.587)
Set a strong password for the backup service account that is going to be used for backing your NSX-T manager.
Make sure the passwords you select meet VMware’s and your company’s password complexity requirements.
VMware password complexity requirements:
- At least 12 characters
- At least one lower-case letter
- At least one upper-case letter
- At least one digit
- At least one special character
- At least five different characters
- No dictionary words
- No palindromes
- More than four monotonic character sequence is not allowed
Destination Directory: Input the absolute path where you want the backups to be stored. This directory cannot be the root directory (/) and the directory must already exist.
“The directory must already exist and cannot be /. If you have multiple NSX-T data center deployments, you must use a different directory for each deployment. If the backup file server is a Windows machine, you still use the forward slash when you specify the destination directory. For example, if the backup directory on the Windows machine is c:\SFTP_Root\backup, specify /SFTP_Root/backup as the destination directory”
NSX-T DATA CENTER INSTALLATION GUIDE (pg. 587)
Enter passphrase: Here you will enter a passphrase to encrypt the backups generated
Confirm passphrase: Re-enter the passphrase you entered above to confirm
Note: If you forget the passphrase you cannot restore any of your backups!
SSH fingerprint: You can leave this field blank. However, if you want to ensure you are connecting to the correct SFTP server you can paste the SHA256 fingerprint here from your SFTP server
Note: SFTP backups with the NSX-T manager only support the following two cryptographic algorithm’s
ECDSA 256-bit (Elliptic Curve Digital Signature Algorithm)
ECDSA25519 (Elliptic Curve Digital Signature Algorithm w/ SHA-512)
To copy the SHA256 fingerprint from your SFTP server perform the following steps.
1) Login to your SFTP server
2) Run the following command to extract the ECDSA SHA256 thumbprint
ssh-keygen -lf /etc/ssh/ssh_host_ecdsa_key.pubCommand Flags:
-f known_hosts_file
-l list
SHA256 Thumbprint output:
256 SHA256:tm1qkfHb19sx5qzwJABAtojOd4cVywRCjmkoGeHeR6E root@sftp-backup (ECDSA)Copy out the SHA256 string
Example: SHA256:tm1qkfHb19sx5qzwJABAtojOd4cVywRCjmkoGeHeR6E
3) Paste the extracted string in the ‘SSH fingerprint’ field
4) When done, click SAVE
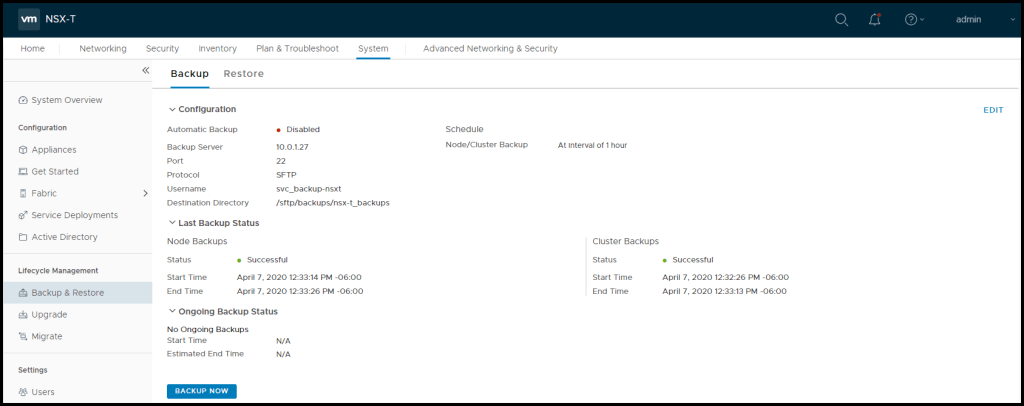
5) Next, let’s test to confirm the backups will be successful by clicking on BACKUP NOW from the System > Backup & Restore view
Configure Automatic Backups
Now that we have successfully configured our backups and confirmed the backups run successfully we can configure automatic backups. Automatic backups are important to ensure you always have a current backup you and your organization can feel confident in restoring in the event of an unrecoverable event.
1) Login to the NSX-T manager appliance
2) Navigate to System > Backup & Restore > EDIT (top right corner) > SCHEDULE
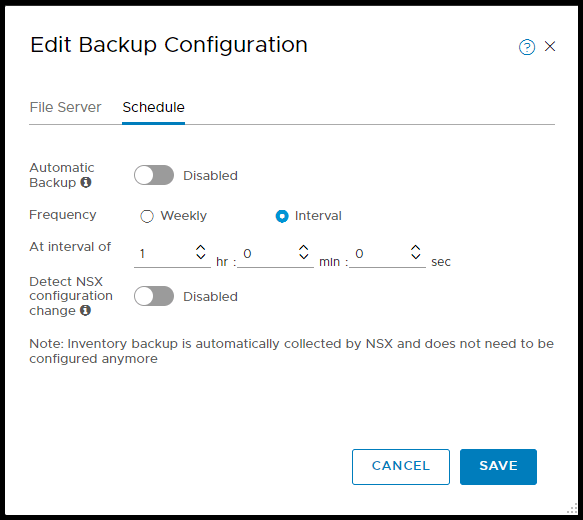
3) Fill in the following information in the SCHEDULE tab
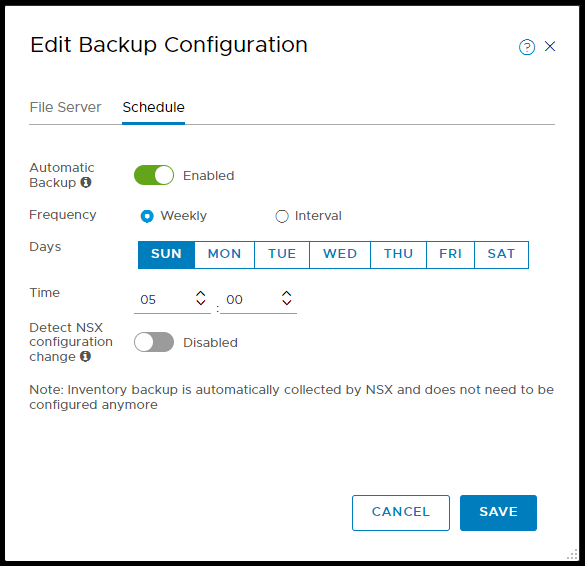
Automatic Backup: Toggle on to enable automatic backups
Frequency: Choose Weekly or an Interval to specify below
At Interval of: determine the interval based on the frequency type selected above
- Weekly Interval: Select which days of the week (1 or more) and the time of day the backup should be executed
- Interval: Select how often you want the backups to occur (hour:min:sec). This allows for a more aggressive backup option for highly dynamic environments
Detect Configuration Change: Toggle on to allow the NSX-T manager to automatically trigger a backup when a change to the configuration is made
- Update Interval: Choose how much time must pass after a configuration change has been detected before the backup begins
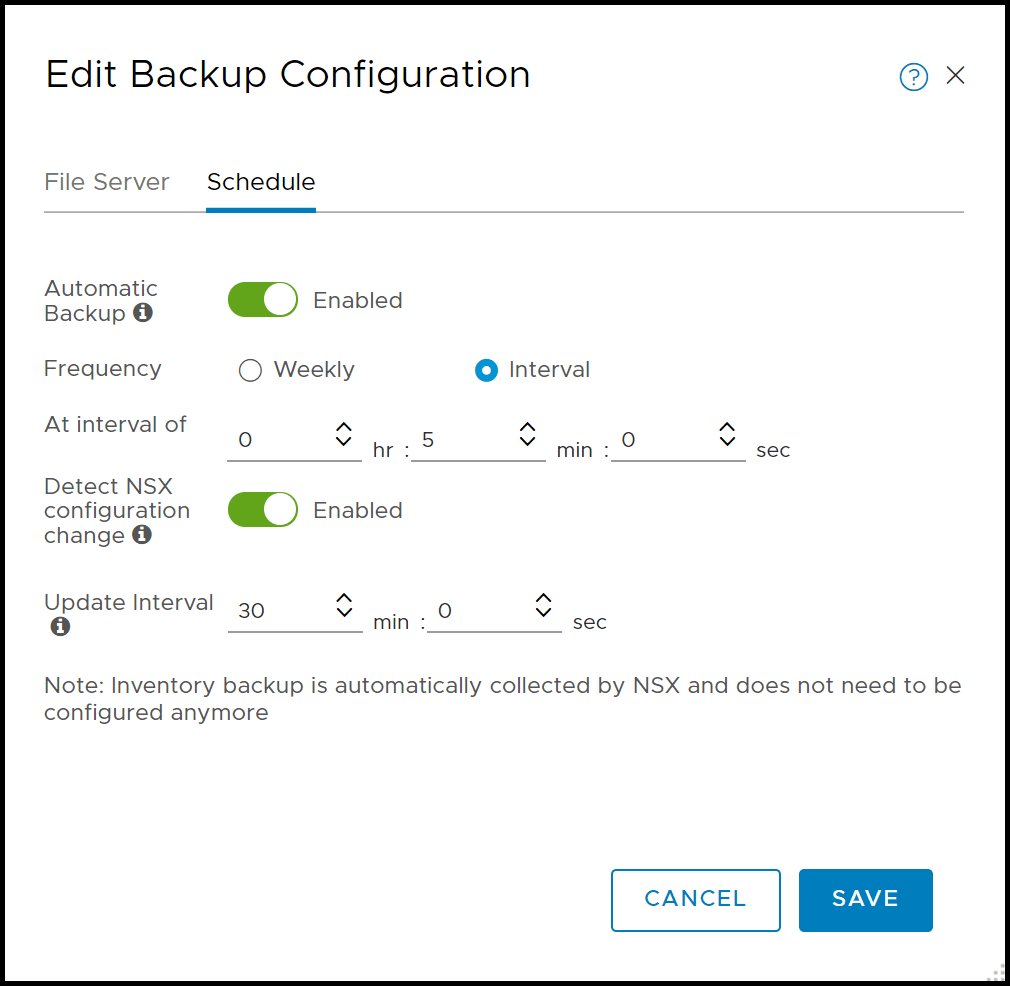
4) When done, click SAVE
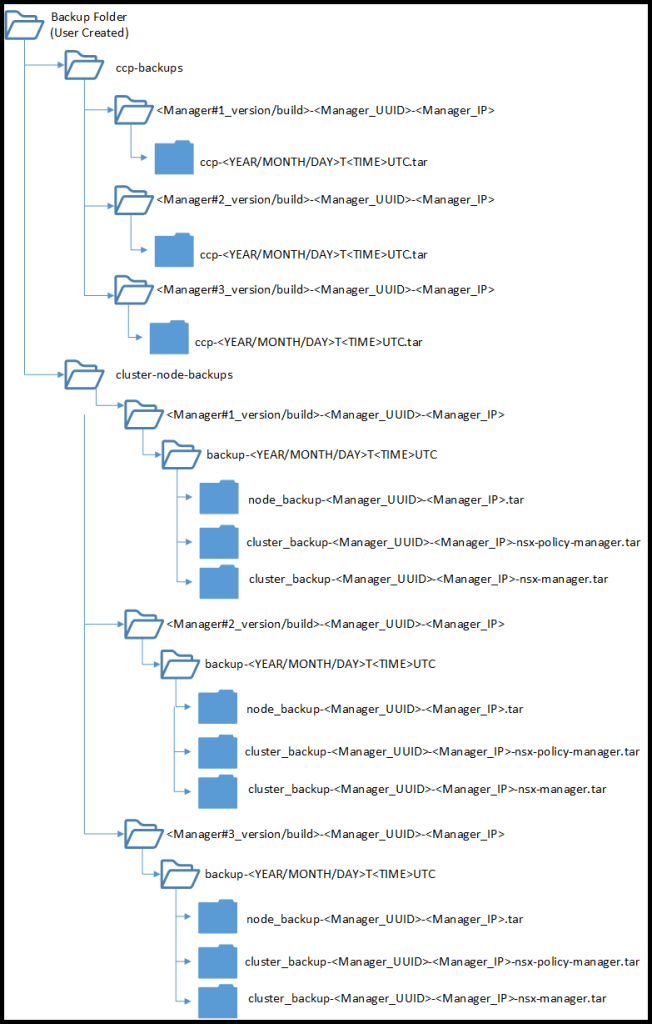
Backup File Structure
When implementing a backup solution it is important to understand what your backup file structure is going to look like in the event you need the backup files for a recovery and to validate successful backups as well as keep your backup folders organized.
When a backup job is run whether it be via a previously scheduled job via the scheduler or a manually run backup, the files and folders created are the same. Here is a breakdown of the NSX-T backup folder structure created on your SFTP server destination storage location.
Pruning your Backup Files with Cron
Now that we have our backups configured and scheduled to occur automatically all that is left is to keep all your automated backups organized by limiting how many backups are kept. By implementing an automated way to address how many backups are retained, we can minimize the amount of space consumed on the SFTP backup servers backup location. In addition to keeping your backup storage requirements small, it is important to only maintain backups your organization can reasonably restore too. A backup that is too old may not be able to be restored due to the backup being taken on a previous version of NSX or other environmental dependencies that exist that are not controlled by NSX-T for your workloads to function properly after a restore.
NSX-T does not provide an automated solution from the NSX-T manager retain a certain number of backups. So we are going to use a simple, easy to implement way to retain backups via cron on the SFTP server.
1) Login to your SFTP backup server
2) Using a text editor (vi,nano, etc…) we are going to add a cron job to run everyday that will look for files/folders older than 30 days and delete them
vi /etc/crontabDefault crontab file:
# /etc/crontab: system-wide crontab
# Unlike any other crontab you don't have to run the `crontab'
# command to install the new version when you edit this file
# and files in /etc/cron.d. These files also have username fields,
# that none of the other crontabs do.

SHELL=/bin/sh
PATH=/usr/local/sbin:/usr/local/bin:/sbin:/bin:/usr/sbin:/usr/bin

# m h dom mon dow user  command
17 *    * * *   root    cd / && run-parts --report /etc/cron.hourly
25 6    * * *   root    test -x /usr/sbin/anacron || ( cd / && run-parts --report /etc/cron.daily )
47 6    * * 7   root    test -x /usr/sbin/anacron || ( cd / && run-parts --report /etc/cron.weekly )
52 6    1 * *   root    test -x /usr/sbin/anacron || ( cd / && run-parts --report /etc/cron.monthly )
We are going to add at the bottom the following:
# SFTP BACKUP CRONJOB TO REMOVE BACKUPS OLDER THAN 30 DAYS
18 1    * * *   root    find /sftp/backups/* -mtime +31 -exec rm {} \;
Line 1: Comment section created to identify what the cron job’s purpose below is
Line 2: The cronjob itself saying to run at 01:18 every day with user root to look in the /sftp/backups/* folders (NSX-T manager backup location) for files older than +31 days. If the file/folder is older than that value to remove the files
